Elo Touch Solutions, 1033 McCarthy Blvd, Milpitas, CA 95035
This document includes the following:
Elo Touch Solutions Driver User Manual
Setup from Windows DesktopSingle Monitor, USB Controller
Multiple Monitors, USB Controllers
Adding Additional USB Controller
Single Monitor, Serial Controller
Multiple Monitors, Serial Controllers
Adding Additional Serial Controller
Uninstalling the Driver
Video Alignment (Calibration)
Unusual Combinations of Expanded Desktop with Multiple Monitors
Control Panel (Elo Mouse Properties)
Right Click on Hold
P/N 008579
Revision G
Copyright 2013 Elo Touch Solutions, All Rights Reserved.
No part of this publication may be reproduced, transmitted, transcribed, stored in a retrieval system, or translated into any language or computer language, in any form or by any means, including, but not limited to, electronic, magnetic, optical, chemical, manual, or otherwise without prior written permission of Elo Touch Solutions.
Disclaimer
The information in this document is subject
to change without notice. Elo Touch Solutions makes no representations or warranties
with respect to the contents hereof, and specifically disclaims any implied warranties
of merchantability or fitness for a particular purpose. Elo Touch Solutions reserves
the right to revise this publication and to make changes from time to time in the
content hereof without obligation of Elo Touch Solutions to notify any person of such
revisions or changes.
Elo TouchScreen Driver 5.X
Windows 8 32-bit and 64-bit Support.
Addition of 25-point (enhanced) calibration.
Added support for 2520 and 2521 controllers.
![]()
This user manual describes the installation of the touch-screen driver software and the
user selectable features of each screen. This manual refers to the software/driver that
are compatible with the Microsoft Windows operating systems including: Windows XP,
Windows Vista, Windows 7, and Windows 8. Drivers for both 32-bit and 64-bit versions of
these operating systems are included in the driver package and are automatically selected
based on OS type.
The drivers allow operation of the touch-screen over either USB or serial port. Some
touch-screens come with both USB and Serial options where either one can be used, but
not simultaneously. For each touch-screen, you must use either USB or serial connection
in order for touch to function. In addition, you can connect multiple touch-screens to
a system and each separate touch-screen can be connected through USB or serial. For example,
if you can have three touch-screens connected to the system, they can be configured in any
of the following ways:
Scrn1 Scrn2 Scrn3 USB USB USB USB USB Serial USB Serial USB USB Serial Serial Serial USB USB Serial USB Serial Serial Serial USB Serial Serial Serial
The installation process allows you to select which drivers, USB, serial or both,
that you want to install. Installing more drivers than you need is not a problem.
The driver package includes utilities which allow users to customize the operation
of their touch-screen in various ways. That information will be covered later in
this user manual.
![]()
Because there are many options to consider when installing the driver files, this section will cover the most common ways the driver can be installed. Please consult Elo Application Engineering for additional situations that are not covered in this section.
Run the self-extracting zip file to unzip the installation files and initiate the EloSetup installer.
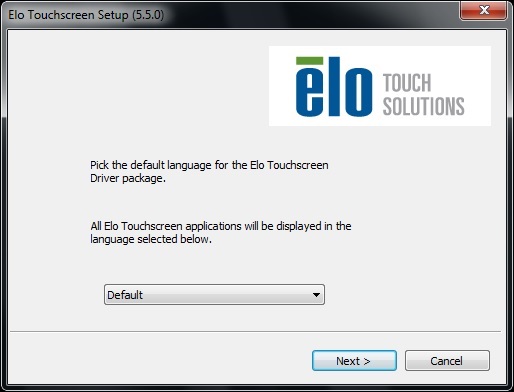
The selected language will be applied for all Elo components in the future operation on the system. To change the user language you must first uninstall the Elo package, then re-install it with the desired language from the language drop down menu.
The current supported languages are English, French, German, Spanish, Italian, Portuguese, Japanese, Simplified Chinese and Traditional Chinese. This also applies for all other installation configurations.
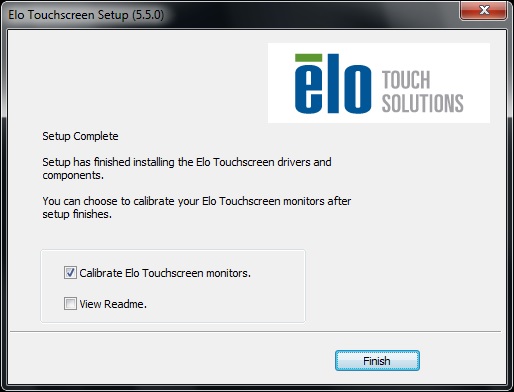
The driver files are installed after the Setup Complete screen appears.
After the driver is installed, an "Elo Touchscreen" icon will appear in the Windows Control Panel and in the list of installed programs on the computer.
![]()
2. Multiple monitors, USB controllers
Follow the above installation procedure for Single monitor, USB controller.
The driver files will install and Installation complete screen will appear.
You may choose to run calibration (the Elo Video Alignment program, EloVa) immediately after installation by selecting the "Calibrate Elo Touchscreen monitors" check box or wait until a later time. If you choose not to run this program now, you can run it from the Elo Control Panel application.
- When EloVa runs for the first time, it will attempt to calibrate all controllers and/or serial ports that were installed. Press the Esc key on the keyboard to terminate or skip calibration for any monitor, or you can also allow the program to time out (as indicated by the progress bar). The EloVa program will continue until all controllers and/or ports have been calibrated.
- Adding Additional USB Controllers
If there are Elo USB devices already installed, plug the USB cable from the touch monitor into the computer and run EloVa to calibrate the touch monitors.
3. Single monitor, Serial controller
Run the self-extracting zip file to unzip the installation files and initiate the EloSetup installer. EloSetup will launch. Select the language for the driver package.
The selected language will be applied for all Elo components in the future operation on the system. To change the user language you must first uninstall the Elo package, then re-install it with the desired language from the language drop down menu.
The current supported languages are English, French, German, Spanish, Italian, Portuguese, Japanese, Simplified Chinese and Traditional Chinese. This also applies for all other installation configurations.
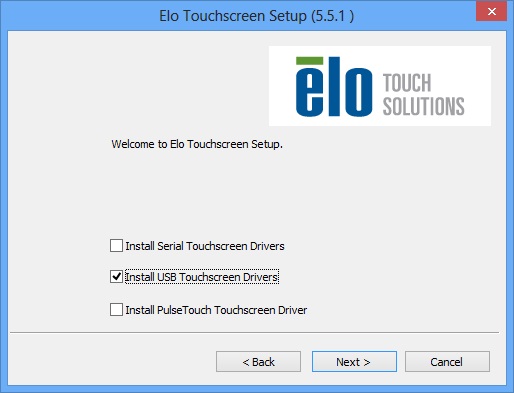
Check the Install Serial Touchscreen Drivers check box
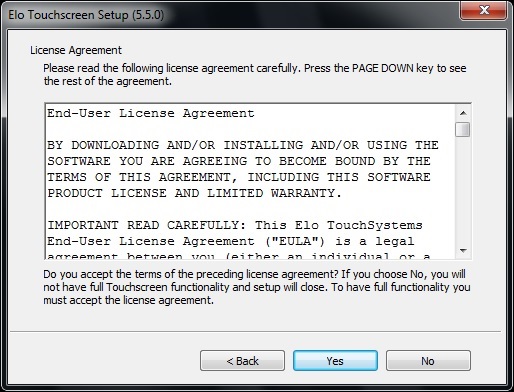
Review and accept the License Agreement by clicking "Yes".
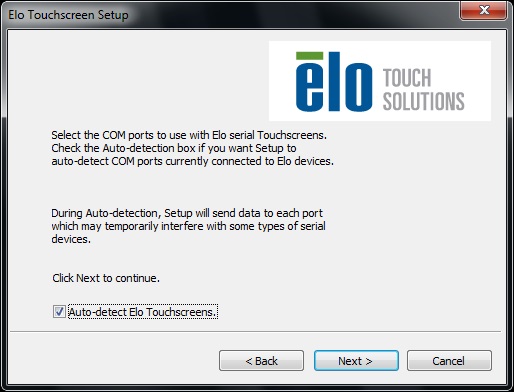
- Check Auto-detect Elo Touchscreens if your touch monitor serial cable is connected to the computer and the serial cable supports hardware handshaking. If you connect the serial cable later, do not check the Auto-detect Elo touchscreens check box.
3. Click the Next button.
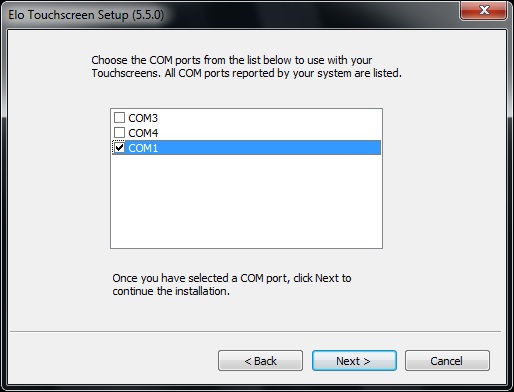
- A list of all the serial port(s) detected on the system will be displayed. Select the desired COM port(s) and click Next.
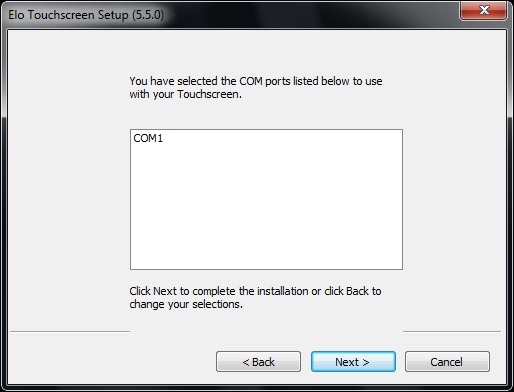
4. Selected COM port(s) will appear in the next screen. Click Next to proceed with the installation.
If you checked the auto-detect box in the previous screen, and your touch monitor serial cable is attached to the computer, the COM port that you selected should be checked in the list. If this is the case, click Next and proceed to the next screen.
The COM port you selected will be shown on this screen to verify the settings and give you the opportunity to make any changes to your COM port selection before the driver is installed. Click the Back button to modify any of the previously made selections. Click Next to initiate the installation of the driver files.
- Depending on the revision of the driver you are installing, Windows may advise you that the "Software you are installing has not passed Windows logo testing." In this case, select Continue Anyway to proceed with the installation. This message can be suppressed in future installations by changing the selection in the Driver Signing Options.
The Setup Complete screen will appear after installation completes. Check the Calibrate Elo Touchscreen monitors. check box if not already selected and click Finish.
Screen calibration will start. Touch targets firmly to complete touchscreen(s) calibration.
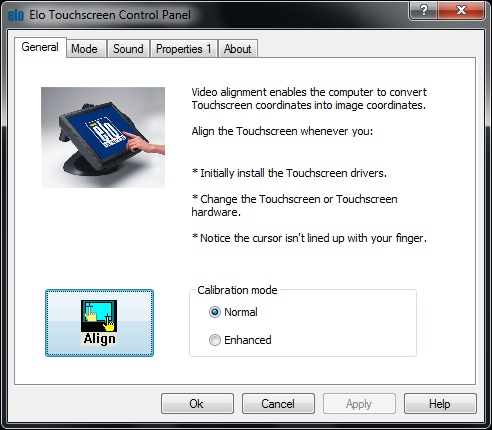
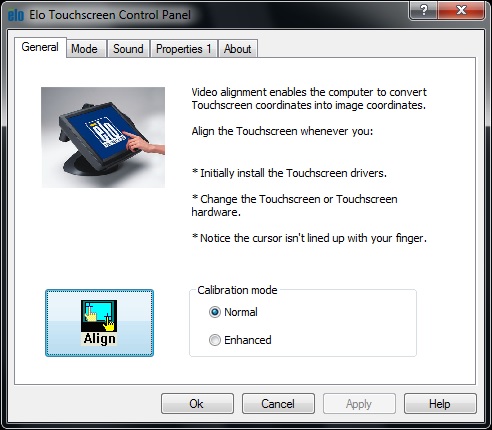
Double-click the Elo icon on the system tray. The Elo Touchscreen Control panel will appear.
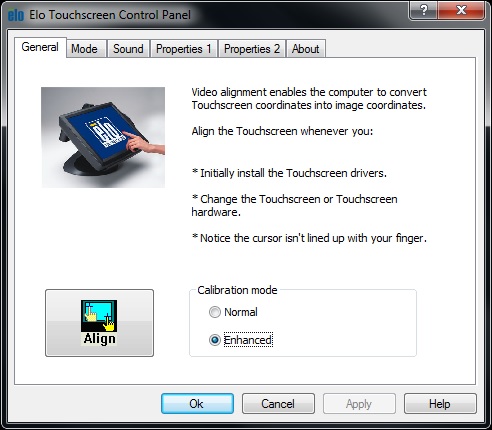
The General tab includes an Align function. Follow the instructions as indicated to calibrate all connected and supported touchscreen(s). Calibration must be done in instances shown on the General tab.
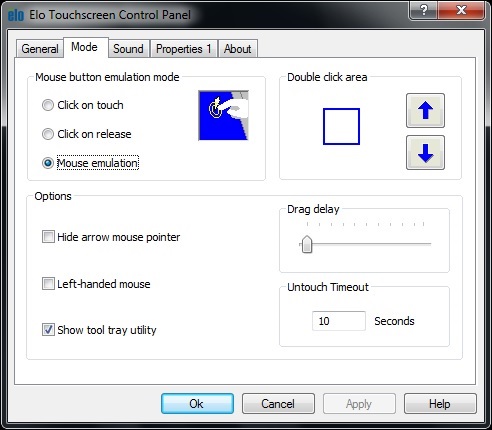
Mode tab provides the adjustments for:
Mouse button emulation mode
Double click area
Drag delay
Untouch Timeout
- Mouse options include: Hide arrow mouse pointer, Left-handed mouse, and show tool tray utility.
4. Multiple monitors, Serial controllers
Follow the general procedure for Single monitor, Serial controller installation above, auto detecting or selecting all the serial ports that you will use.
The driver files are installed after the Setup Complete screen appears.
- You may choose to run calibration (the Elo Video Alignment program, EloVa) immediately after installation by selecting the "Calibrate Elo Touchscreen monitors" check box or wait until a later time. If you choose not to run this program now, you can run it from the Elo Control Panel application.
When EloVa runs for the first time, it will attempt to calibrate all controllers and/or serial ports that were installed. Press the Esc key on the keyboard to terminate or skip calibration for any monitor, or you can also allow the program to time out (as indicated by the progress bar). The EloVa program will continue until all controllers and/or ports have been calibrated.
Adding Additional Serial Controller
- To add addition Serial controller(s), first uninstall the current Elo application then connect the additional serial controller(s) to the system. Finally re-install the serial driver to include the additional COM ports
5. Multiple monitors, Serial and USB controllers
Run the self-extracting zip file to unzip the installation files and initiate the EloSetup installer.
EloSetup will launch. Check both the "Install Serial Touchscreen Drivers" and "Install USB Touchscreen Drivers" check boxes.
Review and accept the License Agreement by clicking "Yes".
The program will appear to proceed as a single/multiple serial controller installation, but the USB driver files will also be installed.
The driver files will install and Setup Complete screen will appear.
When the Setup Complete screen appears, you may choose to run calibration (the Elo Video Alignment program, EloVa) immediately or wait until later. If you choose not to run this program now, you can run it from the Elo Control Panel application. When EloVA runs for the first time, it will attempt to calibrate all controllers and/or serial ports that were installed. Press the Esc key on the keyboard to terminate or skip calibration for any monitor, or allow the program to time out (as indicated by the progress bar). The program will continue until all controllers and/or ports have been calibrated.
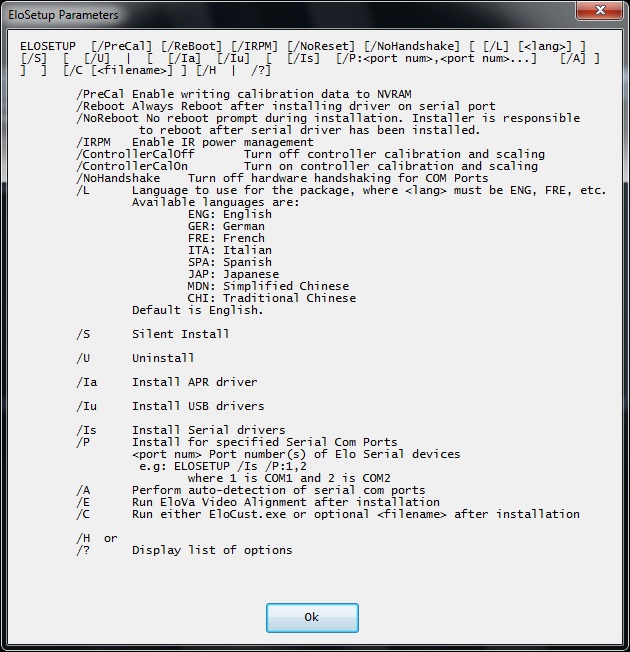
Silent Install and DOS Command Line Options
Silent Install feature is used to disburse a change/addition/deletion from a large network of touch screen monitors in one attempt without any action from the user.
The EloSetup program for this driver may be run as an attended or unattended program from a command line, batch file, etc. Silent Install is considered unattended mode because no user interaction is required. Attended mode requires user interaction during the installation process. Silent install is launched from the DOS prompt line
To Silent install for USB controllers use:
EloSetup /iu /sTo Silent install for a Serial controller on COM1 use:
EloSetup /is /P:1 /s /Precal
Enable PreCalibration allows the calibration data to be stored in the touch monitors. Touch monitors with pre-calibration data can be transferred to a different computer without the need to recalibrated on the other computer. PreCalibration feature must be enabled on the other computer in order for the driver to read the calibration from the touch monitor. System reboot may be required in order to get the pre-calibrated monitors to work correctly. Only 3-point calibration data can be stored in the touch monitor. The enhanced, 25-point calibration data cannot be stored in the touch monitor.
/Irpmoff: This feature applies to IR 4500 Serial controllers only. By default (at installation), it is enabled. This option sets the registry valueHKEY_CURRENT_USER\Software\EloTouchsystems\EnableIRPowerManagement to 0
/Reboot: With certain types of serial ports, a reboot of the computer may be required to complete the driver installation. In some cases, the installer will automatically detect this need and prompt for a reboot. In other cases you may need to use this option to force the installation to reboot the system after the serial driver gets installed.
To view all EloSetup options, run EloSetup as EloSetup /h.
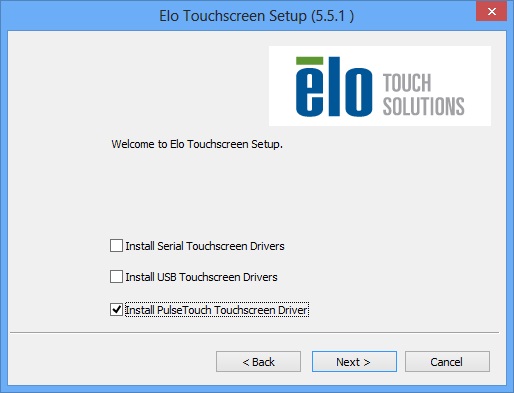
Installing the PulseTouch Drivers
The PulseTouch driver will automatically detect the appropriate controller for installation. PulseTouch only works with USB controllers and on Windows XP, Windows 7, and Windows 8 operating systems.
Run the self-extracting zip file to unzip the installation files.
- EloSetup will launch. Select the language for the driver package.
3. Check the Install PulseTouch Touchscreen Driver check box.
Note: The Install Serial Touchscreen Drivers option is not available for PulseTouch monitors.
4. Review and accept the License Agreement by clicking "Yes".
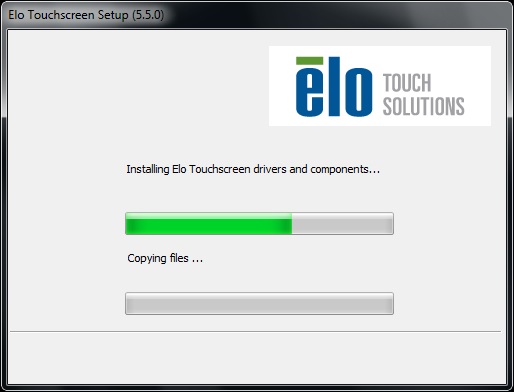
5. Installation progress screen will appear as shown.
6. Files are copied on the touch controller. The copy process may take up to 4 minutes.
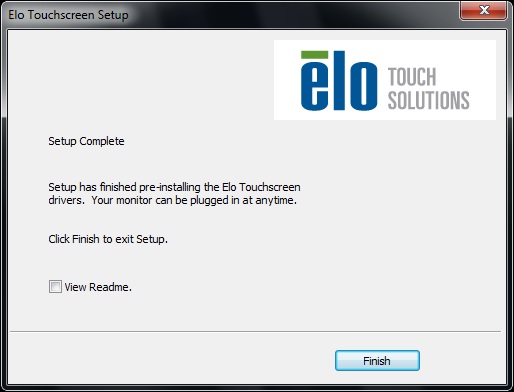
7. Click on Finish to complete and close the installer. Video alignment is not required for PulseTouch.
8. Clicking on the Elo system tray icon will bring up the Elo Touchscreen Control Panel.
9. Touch screen properties are displayed in the Elo Control Panel's Properties tab. Each touch screen monitor will have its only Properties tab.
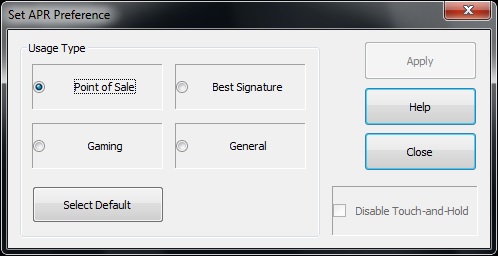
10. PulseTouch usage type can be modified by clicking on the Set PulseTouch Preferences button in the Elo Properties tab. After selecting Usage Type, click Apply to apply the changes made.
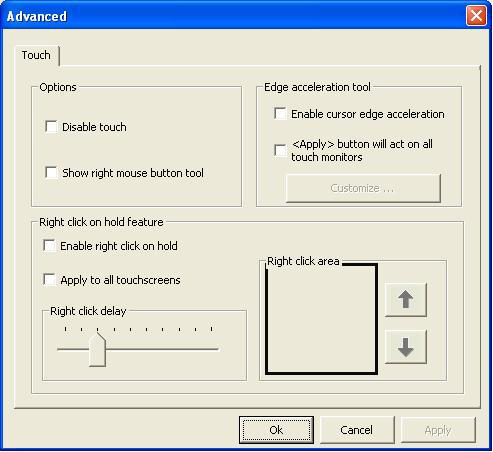
11. For advanced modifications, click on the Advanced button in the Properties tab. Select desired options in the Advanced window.
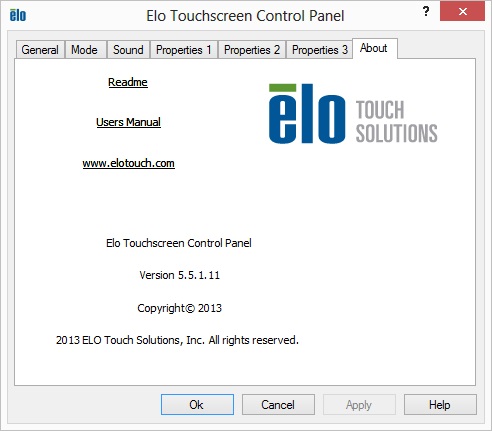
12. Clicking on About tab will display the driver version as well as access to resource files and links.
IR Monitor
Driver installation process for IR touch screen monitors is the same as other monitors discussed previously in the User manual. The only differences are as follows:
Once the driver installation is complete, the Elo icon will appear on the system tray. Clicking on the Elo icon will display the Elo Touchscreen Control Panel.
The General, Mode, Sound and About tabs are same as other monitors detailed in this User Manual.
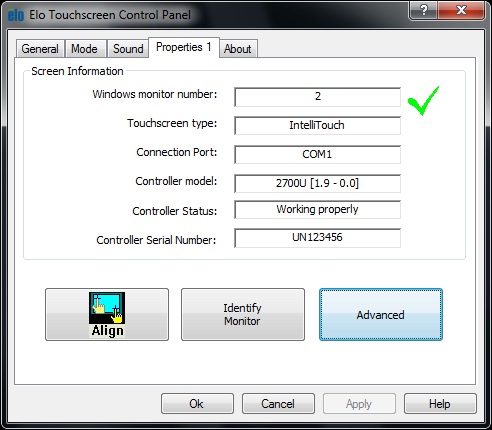
The following screen will appear after clicking on Properties tab:
Advanced modifications can be made in the Advanced window by clicking on the Advanced button in the Properties tab. Advanced window will consist of three tabs: Touch, Beam and Sound
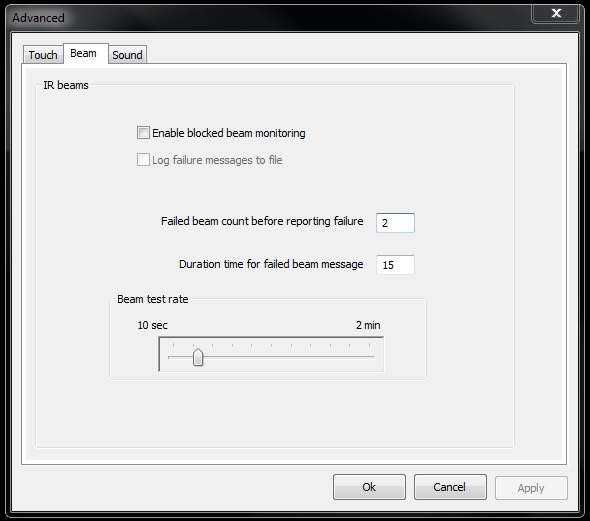
Click Beam tab.
Each of the Beam tab features are defined below:
- Enabling "Enable blocked beam monitoring" will actuate blocked beam monitoring.
- Enabling "Log failure messages to file" will create a log file in C:\
- Failed beam count before reporting failure number modified here.
- Duration time for failed beam message can be specified here.
- Beam test rate is adjusted by moving slider control between 10 seconds to 2 minutes.
You must click the "Apply" button to apply any changes made.
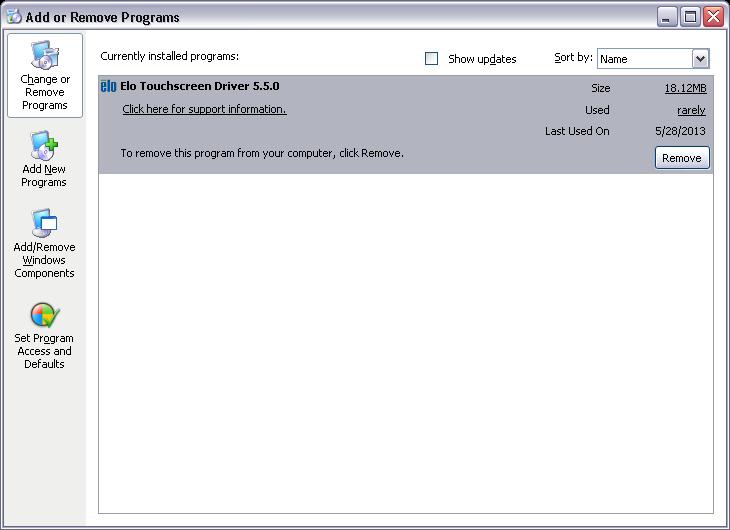
Uninstalling Elo Touchscreen Driver
If a driver is required to be removed from the computer, the steps are as follows:
1. Go to your computer's Control Panel2. Select "Add or Remove Programs" (Windows XP) or "Programs and Features" (Windows 7 & 8)
3. Select the Elo Touchscreen driver open, then select Remove (Windows XP) or Uninstall (Windows 7 & 8). Elo Uninstaller will launch and proceed with removal of drivers from the computer.
Touch functionality can be disabled from the previously mentioned Advanced window. Follow the below steps to enable/disable touch functionality:
- Launch the Elo Touchscreen Control Panel.
- Select the Properties tab to the touch screen which you want touch disabled on.
- Click on the Advanced button.
- In the Options section, select to enable/disable the "Disable touch" option.
- Click Apply or OK to apply the change made.
- Repeat the above steps for each touch screen which you want touch disabled on.

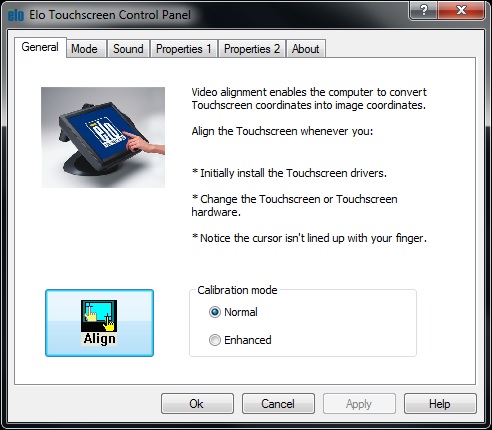
Video Alignment (calibration) ensures that the mouse cursor appears at the position of touch.
Elo uses a three-point calibration sequence that accepts touch screens with any orientation of the X or Y-axis, whether its in landscape or portrait mode.
Once calibrated, the touch screen will be ready to use automatically each time the system is started.
When Video Alignment is selected, you will encounter the two screens below. Three target calibration points are used. When each target point is touched, it will move to a new target location. Once the screen is calibrated, the cursor should follow any new point on the touch screen.
The video alignment (calibration) program can be launched through the following scenarios:
During driver installation a check box can be selected to run the alignment program automatically after setup completes.
Through the Elo Touchscreen Control Panel application in the General tab by clicking the "Align" button.
Through the Elo Touchscreen Control Panel application in the Properties tab for the individual monitor and clicking the "Align"/"Re-Align" button.
From the Elo system tray in the Windows task bar by selecting the "Align" option in the contextual menu.
By running EloVa.exe directly from the Windows command line or \Windows\System32 directory.
By calling EloVa.exe directly from the installed application folder.
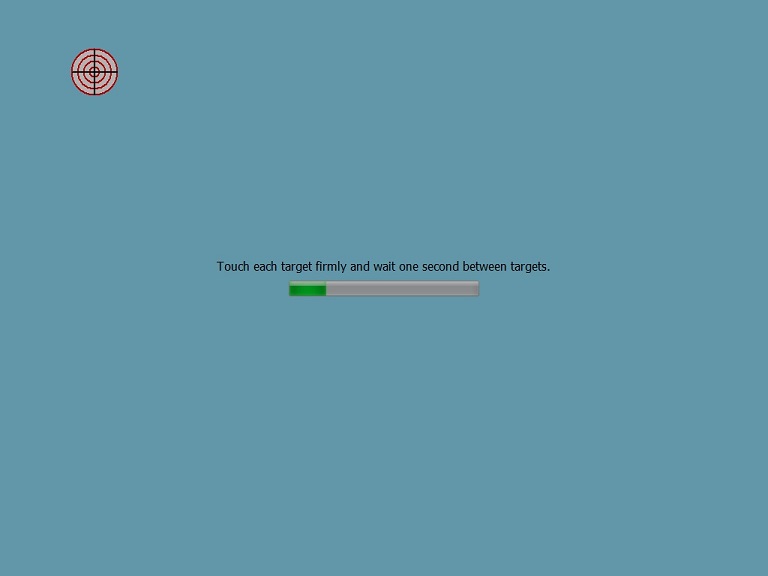
Running the Calibration ProgramWhen you run EloVA using one of the above options, touch each of the three targets as they appear on the screen.
You will then be asked to touch various points on the screen to verify that the cursor appears at the position touched. If the cursor appears at the position touched, click the green arrow to accept and exit out of the calibration program. If the cursor does not appear at the position touched, click the blue curved arrow and the calibration program will run again.
If you are using multiple monitors the alignment program will run on each individual monitor. If one of the monitors is not a touch monitor, Press the Esc key on the keyboard and the alignment program will advance to the next monitor. You can also wait until the program times out as indicated by completion of the progress bar.
Target Locations on the Screen
When a touch screen software is installed on an Elo monitor and the touch targets for calibration are not visible, target locations can be defined in an auxiliary file. Target locations for every monitor can be defined in a configuration file, EloTarget.conf. Contact Elo Application Engineering for availability and details on how to use this file.
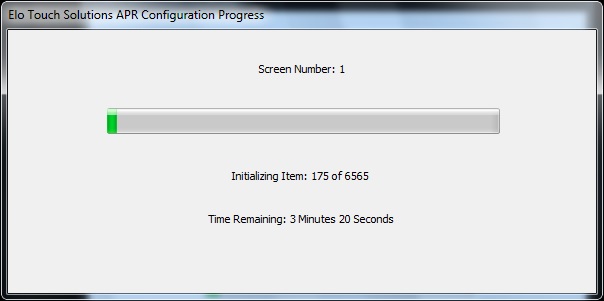
Once the initialization has been complete, the user should touch the screen. As touch data is being collected, you should continue to touch the screen as instructed.
Follow the same procedure for all 3 targets as they appear.
Confirm the calibration by touching various locations on the screen and verifying that the cursor appears in the position touched. If the cursor appears at the position touched, click the green arrow to accept and exit out of the calibration program. If the cursor does not appear at the position touched, click the blue curved arrow and the calibration program will run again.
If you are using multiple monitors the calibration program will run on each individual monitor. If one of the monitors is not a touch monitor, Press the Esc key on the keyboard and the calibration program will advance to the next monitor, or wait until the program times out as indicated by completion of the progress bar.
Note: Acoustic Pulse Recognition (PulseTouch) is factory calibrated. Video alignment or calibration is not required.
EloVA can be run in either landscape or portrait mode.
Unusual Combinations of Expanded Desktop with Multiple Monitors
Unusual multiple monitor combinations may create an expanded Windows desktop that is not recognized by the default video resolutions built into the EloVA program. For this reason, an auxiliary file, EloVideo.txt, is available to supplement the defaults. If you are running an expanded desktop multiple monitor resolution that is not multiples of standard monitor resolutions, you may experience difficulties in calibrating all of your monitors properly. Contact Elo Applications Engineering for availability and details on how to use this file.
Enhanced Mode Calibration: 25-Point Calibration
In some rare cases, certain touchscreen types such as AccuTouch, even after applying the 3-point video alignment (calibration), linearity near the touchscreen�s edges will be less than desirable. If user feels this is a problem, the user may need to run the enhanced mode calibration: the 25-point calibration.
To run enhanced calibration, launch the Elo Touchscreen Control Panel application and select the �General� Tab. Select the �Enhanced� radio button and click Apply. If the touchscreen is not of AccuTouch touchscreen type, a prompt will be displayed stating that enhanced calibration will not improve the touch accuracy for those connected touchscreen(s).
To initiate calibration, click the �Align� button. Users can also initiate calibration by right-clicking on the system tray icon and selecting the �Align�� option. Once calibration is initiated, the user needs to touch each of the 25 targets firmly to complete the calibration process.
The 25-point calibration should be used for tocuhscreens with known touch performance issues along the screen's edges (for example AccuTouch); applying 25-point calibration to other types of touchscreens will not improve touch performance; in some cases, it may degrade touch performance.
The application name for 25-point calibration is EloVa25p.exe and is located in Elo Touch Solutions installation folder. The default installation path is: C:\Program Files\Elo Touch Solutions.
The configuration file �EloVa25.cfg� stores all parameters for the 25-point calibration. The user should not make any changes to the contents of this file.
All parameters specific to 25-point calibration are stored in the registry under the touch device�s Device Parameters/EMParams (EM stands for �Enhanced Mode�). If the standard 3-point calibration is performed on the same device again, the EMParams sub-key will be removed.
Control Panel (Elo Mouse Properties)
If there are multiple touch monitors connected then other monitors will also appear in the Elo Touchscreen Control Panel as Properties 1, Properties 2, etc.
The Elo Touchscreen Control Panel application allows configuration of the driver to suit the user's needs as well as to display system and diagnostic information to the user.
Each tab in the Elo Touchscreen Control Panel will be described in the following sections.
- The General tab is displayed when the Elo Touchscreen Control Panel is launched. The video calibration program, EloVa (Normal) for 3 point calibration or EloVa25p (Enhanced) for 25 point calibration, can be launch from this tab. The other tabs will be described in the proceeding sections.
- 25 point calibration (Enhanced mode) has the capability to achieve greater than 1% linearity.
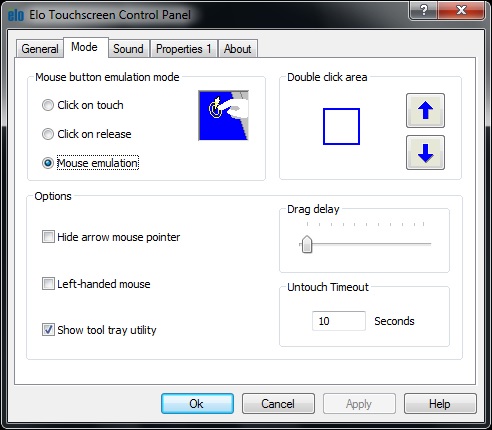
- The Mode tab selects touch screen operating mode and enables you to configure touch functionality and desktop appearance. All selections made in the Mode tab will be activated after clicking the "Apply" button at the bottom of the window.
Mouse button emulation mode is selected by selecting the appropriate radio button. It functions as expected from a standard mouse. Draging and highlighting is supported in this mode. More information in the "Mouse Emulation (Drag and Double-click)" section below.
- Click on touch sends a touch command immediately(a mouse down/up message) at the point of touch on the touch screen. The user's finger must be removed from the touch screen before a new touch on the touch screen can be initiated. Tap and drag is NOT supported in this mode.
- Click on release sends (at the time of release) a mouse down/up message at the point where the screen was last touched. Dragging across objects on the screen will not highlight or select them unless the untouch occurs when the touch is over the object.
- Untouch timeout delay setting from 0 to 1200 seconds with the default being 10 seconds.
Mouse Emulation (Drag and Double-click)
Sends a "mouse down" message at the point of contact.
Selects an object if it was at the initial point of contact.
Drags a selected object on the screen.
Response to dragging is set by the "Drag delay" slider bar.
Sends a mouse up message at the point of untouch.
Double-clicks on an object when the screen is touched twice in rapid succession at the same location.
The speed to achieve double-click is identical to the speed of a successful double-click with the physical mouse.
Double-click speed is set from Mouse Properties in Windows Control Panel (Mouse Properties>Buttons>Double-click speed).
Double click area graphically sets the dimensions of the location around each clickable icon or object on the screen which will be recognized by Windows as a double-click. The size of the wire-frame square displayed in the Double click area tab is the actual size of double-click area accepted by Windows. The square can be increased or decreased in size by touching the appropriate arrows adjacent to the square. Note that the double-click box size is independent of screen resolution and must be defined for each user.
- Options allow various features of the desktop related to the touch screen to be configured. Each of the features selected will be activated after clicking the "Apply" button at the bottom of the tab.
Hide arrow mouse pointer turns off the standard mouse cursor.
Left-handed mouse interchanges the standard two-button mouse button assignments.
- Show tool tray utility activates the Elo system tray icon in the Windows Task Bar. See Tool Tray for a complete description of this feature.
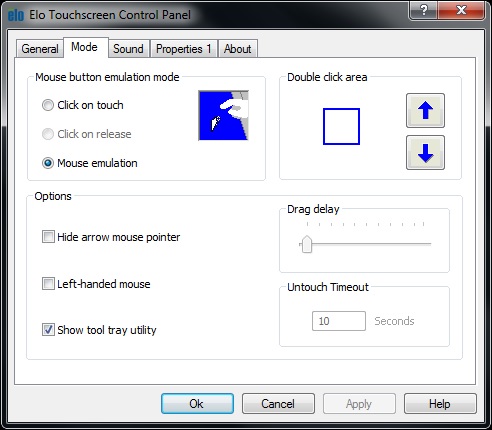
Mouse Button Emulation Mode (PulseTouch)
The Mode options are the same for PulseTouch as noted above, with the exception of Click on Release, which is not supported for those type of touch screens.
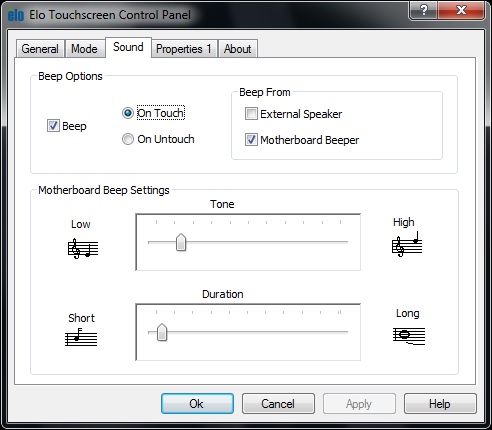
The Sound tab sends a single-frequency tone or "Beep" to the system speaker and/or external speaker each time a valid touch occurs.
The beep is enabled by default when the driver is installed. It may be turned off by unchecking the Beep check box.
With Beep enabled, the user can decide whether the beep occurs as soon as touch is detected or after untouch is detected.
The Tone (frequency) and Duration of the beep can be adjusted by moving the appropriate slider in this tab. Tone and Duration is only enabled when Motherboard Beeper is enabled.
Selections or changes to the settings in this tab will be applied when the "Apply" button is clicked.
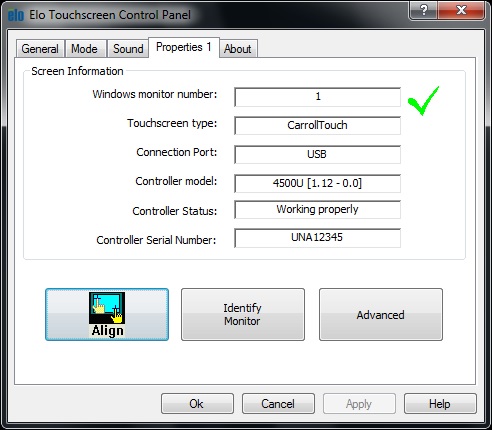
A Properties tab will be created for each touch screen controller installed by EloSetup and for each serial port reserved for a controller, even if that controller is not present. A number will be assigned to each Properties page that is related to the order in which controllers or ports are detected or enumerated. Each Properties page contains information extracted from the touch screen's controller and the system about the monitor, touch screen, controller and internal drive.
In the screen below
Properties 1, Properties 2 are the controllers installed.
- Windows monitor number lists the monitor that corresponds to the "Windows Monitor" from Windows Display Properties in the Windows Control Panel.
- Touchscreen Type lists the Elo touch screen used by its marketing name, i.e., AccuTouch for Elo's five-wire resistive touch screen
- Connection Port will indicate USB or Windows COM port (if Serial) depending how the touch screen is connection to the computer.
- Controller Model lists the marketing model number of the controller attached. It also lists the revision of the firmware loaded in the controller.
- Controller Status indicates whether the controller is "Working properly" or display any errors reported from the controller.
- Controller Serial Number displays the serial number of the connected controller.
The PulseTouch Properties tab is the same as other touch screens with the addition of additional screen information and the Set PulseTouch Preferences button which will allow you to dictate which usage type the PulseTouch monitor will be used for.
The buttons under screen information for any controller type will only appear after each touch screen has been calibrated.
Each Properties page also contains a Video Alignment section that has two functions:
The Identify Monitor button will display the Elo logo on the monitor associated with this Properties page for about one second each time this button is pressed.
The EloVA icon
will launch the video alignment program only for the monitor associated with the current Properties tab. Running EloVA from the Properties page avoids the need to align all monitors in a multiple monitor application when only a single monitor alignment is desired.
If a serial port is reserved for a touch screen controller that is not currently installed, the only Screen information displayed will be the number of the Windows COM port. No Screen configuration buttons will be displayed in this case.Each Properties page also contains an Advanced section to further configure each touch screen on a screen-by-screen basis.
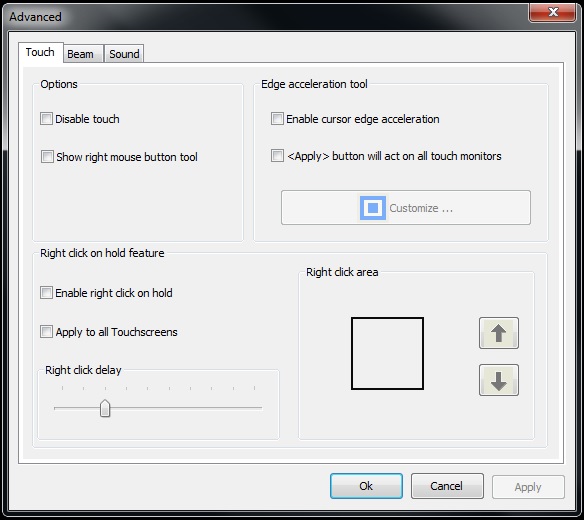
Each Properties tab will include an Advanced button (as seen below). Clicking on the Advanced button will launch the Advanced Features window.
The Advanced window contains the following sections: Options, Right click on hold feature, Edge acceleration tool, and Right click are.
Disable Touch stops touch information from reaching Windows for the selected touch screen. Disabling touch has no effect on the operation of the standard mouse.
- Show right mouse button tool creates a mouse icon on the screen. Clicking on this icon allows the user to have right-handed mouse.
- Right Click on Hold allows a new and efficient way to create right clicks on the touch screen without the Right Mouse Button Tool. If the user touches the screen and continues to touch, a right click is generated on the screen as long as the user remains within the Right click area and after the Right click delay time-out has occurred. The right click delay allows the user to perform other touch screen operations normally. When the user touches the screen and holds his/her finger down, an animated clock is painted at the location and continues to tick and generate a right click at the location after its completion.
Enabling the Right click on hold check box will enable the feature for the current touch screen.
Enabling the Apply to all Touchscreens check box will apple the current values to all touch screens after the "Apply" or "Ok" button is clicked.
The Right click delay slide defines the right click delay value in milliseconds. The right click delay allows the user to perform other touch screen operations normally.
The Right Click Area section allows you to configure the area to generate a right click. This area allows the user the flexibility to touch within a larger area for a better experience.
NOTE: Right click on hold feature is enabled only in "Mouse emulation" touch mode. When Right click on hold feature is turned on, Drag Delay value is set to the minimum of 25 milliseconds.Right Click On Hold function is also not supported for PulseTouch touch screens.
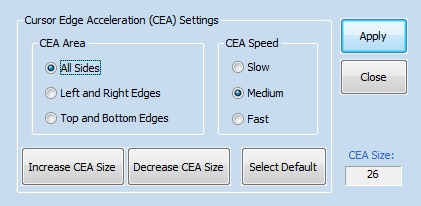
- Edge Acceleration Tool launches the Cursor Edge Acceleration (CEA) utility for the selected monitor. In order to launch this utility, you much first enable the "Enable cursor edge acceleration" check box, then press the "Customize..." button. The CEA utility allows you to configure the cursor edge acceleration area, size, and speed to which the cursor will move to improve the experience in the "hard-to-reach" areas.
This tab will only appear for Carroll Touch (IR) screens (4000 and 4500).
It continuously monitors the health of the IR beams and reports any problems.
Enable blocked beam monitoring allows you to enable or disable beam health monitoring.
Enabling the Log failure message to file check box will write any future beam failure messages to a file "C:\EloDiags.log"
The Failed beam count before reporting failure option allows you to enter the minimum number of failed beams before you get a failure notification.
The Duration time for failed beam message option allows you to enter the number of seconds that the failure notification window will be displayed on the screen. The message will repeat again if the problem is not corrected.
The Beam test rate option allows you to modify the beam test rate from a slider bar. The beam test rate range is from 10 seconds to 2 minutes.
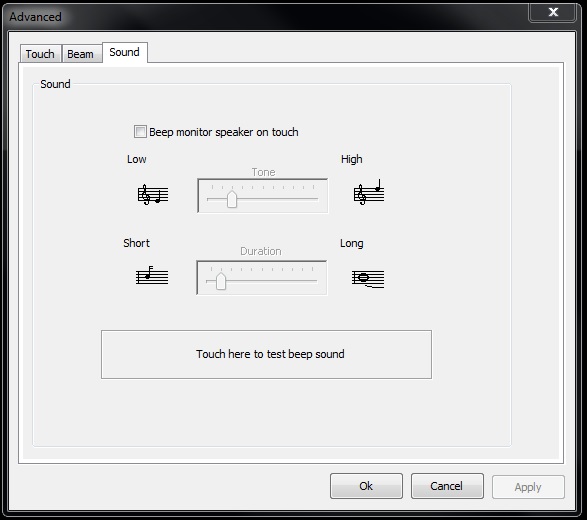
This tab only appears for Carroll Touch (IR) screens that have a separate built in beeper. This feature can be used to provide audio feedback of touches in cases where the screen is placed at some distance from the host computer. Use this tab to configure the sound characteristics of the beeper similar to the "Sound" tab in the main page.
The Beep monitor speaker on touch check box allows you to enable/disable the internal beeper.
The Tone slider allows you to adjust the tone of the internal beeper.
The Duration slider allows you to adjust the duration of the internal beeper.
Pressing on the Touch here to test beep sound area button allows you to test the current settings without changing focus away from the Elo Touchscreen Control Panel. Click the Apply button for any changes to be applied..
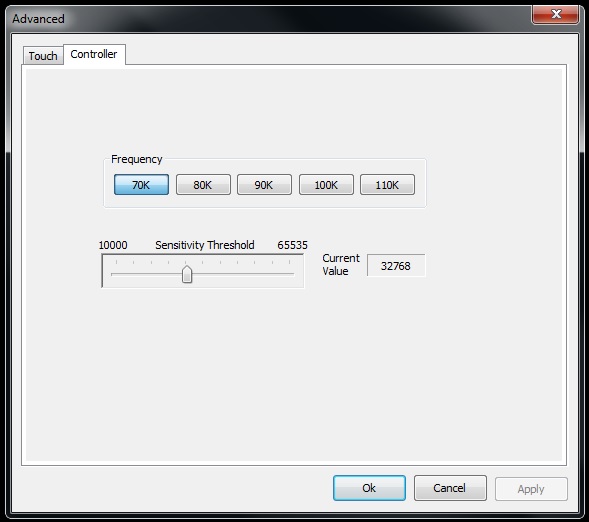
This tab will only appear for Surface Capacitive Touch screens (5020)
Frequency Threshold. The frequency adjustment sets the touch screen driving frequency of the controller. Adjusting this parameter may be needed when the external nearby environment emits similar frequencies to the current drive frequency of the touch screen.
Sensitivity Threshold. The sensitivity threshold slider adjusts how easy it is to activate the touch screen. The lower the value, the more sensitive the sensor/controller will be. The allowable range is from 10,000 to 65,535 with the default value being 32,768 as displayed.
The About tab provides the version of the Elo Touchscreen Control Panel as well as resourceful links including:
Readme document
This Users Manual
Elo's web site
Home Page